
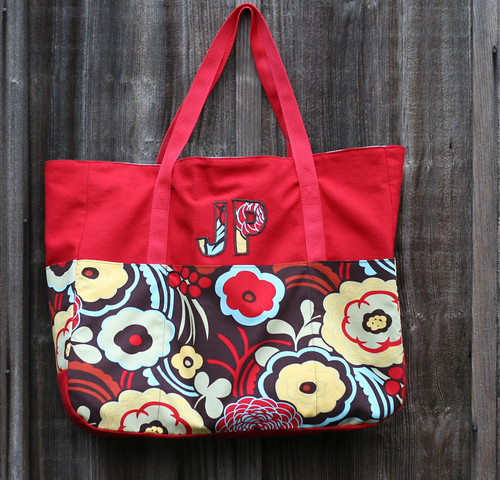
Two weeks ago, I said I was going to make a tote bag for my friend in Iraq -- she needs something to carry her stuff to and from the shower. I'm not sure if this is going to be exactly right for her, but this first one (I'm calling it a "prototype") is finished and will be shipped off tomorrow.
In the original post, I had planned to use oilcloth, but it didn't seem sturdy enough, so I bought this red canvas (canvas does not come in enough fun colors/patterns!) She says it's very dirty there, so I also added the printed cotton fabric to help disguise dirt. She requested that it be colorful and who am I to refuse that request?
The back is kind of sloppy. I accidentally ran over those straps with the iron, which semi-melted them and caused them to shrink. I am not proud of how this ended up, but I wanted to show you how I used the fun fabric on the back and also the small pocket back there:
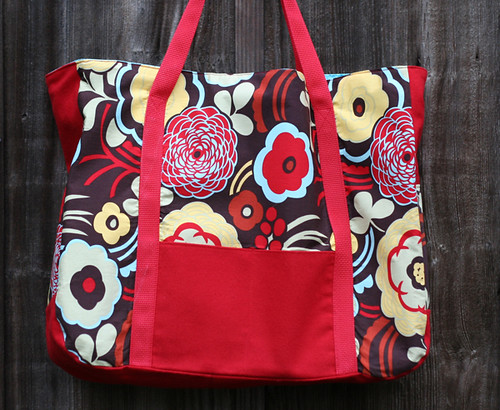
(Ugh. You can totally see the puckers. I can't even believe I'm posting that photo.)
I made some modifications to the pattern -- instead of one big pocket in front, I sewed it into 3 pockets for her to stash stuff. Also, I added a pocket on either side of the bag, which you can kind of see here:

For the interior, I used iron-on vinyl. It came out pretty well, but I'm not sure how durable it will be. Perhaps for the next one, I will use that oilcloth (or another vinyl) for the interior. I also made a divider in there, which about drove me insane -- I've never done that before, so I had to make it all up. I'm not sure if it's right, but it works:
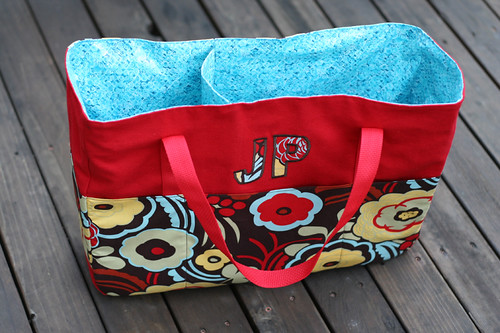
The original pattern also had some curves along the top of the bag as well as the bottom. In sewing, curves are the devil (for me, at least) so I eliminated them from the top. I left the curved bottom, but regretted it as I went further. I should have just squared it off for ease of construction. Live and learn.
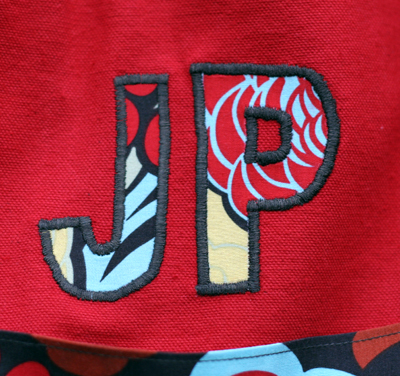
I shortened the handles a bit because she will carry this in her hand -- due to uniform restrictions, she cannot carry something colorful over her shoulder. I did not use the Bedazzler for her name after all -- I thought the appliqué letters just looked so cute! They look a little wonky here, but they're great in person:
If I could, I would sew her up some sort of full-size impervious body suit that would transport her home safely this very instant. Unfortunately, I am not quite that crafty, so I made her what I can, which is a tote bag.
She is not allowed to read blogs where she is, so she won't see this until she gets back. When she does, she can read this post and remember when I made her this bag and laugh at the photos because it looks so clean here but it will be dirty and beat up and very well used by then.
I'm looking forward to that day.
love,
kelly


9 comments:
The bag is really cute!
Hey. That's awesome. Tell her I said Hi. I also wish I had body-armor-crafting capabilities for her.
The bag looks great and I know she is going to appreciate all of the thoughtful additions you made.
You are too hard on yourself. The bag looks great and I'm sure JP will love it! You're right about the initials - they're adorable.
The one time I made an elaborate bag, I nearly threw my sewing machine across the room many times.
Thanks for the positive comments, everyone!
Shayne, the sewing machine *and* iron nearly got chucked while making this bag. It was a real bugger.
But you *love* your iron!
I KNOW! That should tell you just how aggravated I was!!
It looks fantastic! What method did you end up using to make the interior divider?
Dawn -- I think the official method might be called "make shit up until it holds together," but I'm not quite sure.
Basically, (and I'm almost embarrassed to spell this out -- someone who can actually sew will look at this and laugh at me) I had my divider as a "spine" that I sewed all four parts of the bag "walls" to, if that makes sense (two for the front and two for the back). Then I kind of had an "H" shape, looking down on it (the divider being the middle bar of the H).
Then I sewed the two pieces that made up the bottom liner along the bottom of the divider, then along the bottom edges of both front and back and up the sides.
Does that make any sense at all?
Post a Comment