
I have Denise interchangeable knitting needles that are basically what that name says -- you can put different sized needles on different length cords for, well, different knitting projects. I absolutely love them and recommend them for beginning knitters -- it's a real bargain vs. buying all of those different sized needles for each project!
The only drawback is that all of the needles are the same color (pale grey) which can sometimes make it difficult to figure out at a glance which size they are -- the sizes are printed in a very tiny font on the sides of the needles. "5" and "6" look a LOT alike. So, what to do about that?
Well, I got the idea to dye my needles from KnittingHelp -- an amazing resource for knitters. The video tutorials are incredible and brilliant and will answer any and all knitting questions you may have. She sells dyed needles right here (although it looks like she's currently out of stock) and it's a great deal -- a regular set is $50 and hers are $70. Totally worth $20 to have her do it. If you don't already own a set. Or, um, two.
I already own a set (um, two) and I didn't want to re-buy the needles, so I decided to try and dye mine. I'm a wuss so I first put out the call on Ravelry (awesome knitting and crochet community ... if you're not a member yet, sign up now. You'll get your invite to join in a few weeks) to see if anyone else had done it.
The Ravelers came through -- several people had success and posted directions (if you're a Ravelry member, here is the link to the thread o' explanations). So my friend Jan (Hi, Jan!) and I got together to dye our needles (she also owns two sets) last weekend.
We used everyone's favorite dye: Rit. Here are the colors we used:

According to various directions on Ravelry, the recipe is one package of powdered dye to one quart of water. I had some quart mason jars, so we used those.
Basic steps:
1. Put the dye and enough hot water to dissolve it in a mason jar
2. Add the needles and fill up the rest of the jar with hot water.
3. Put the jar with your needles in it into the microwave for 2 minutes (this part was nerve-wracking).
4. Remove jar from microwave and let sit for 30 minutes.
5. Remove needles from dye and give them a 10 minute vinegar soak.
When we took the first jar out of the microwave, we poked around in there to make sure they had not melted. Yay! They had not! Here are 4 out of 5 of the jars, containing needles stewing in their dye:

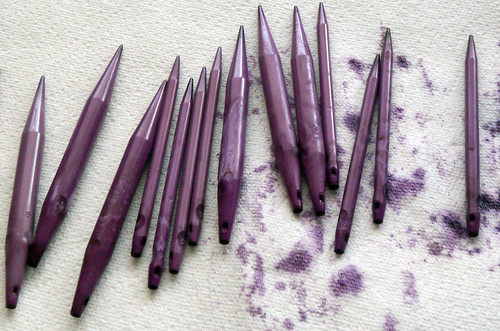
The purple and the blue only took one time through the process. Here's the purple after we removed them from the jars:
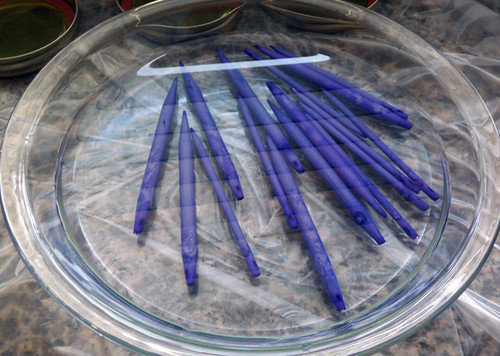
And here are the blue needles sitting in their 10 minute vinegar bath:
When we examined the orange, fuchsia, and "scarlet" (Oh, Rit!) after the first 30 minutes, they were so light that we put them through another round. Orange and fuchsia were good then, but "scarlet" required a third round.
While waiting for our needles to finish, I wandered into Jan's dining room and found that even her cat is crafty. I give you Interpretive Art (Fang and Claw) by Seamus the Cat:

(Seamus, when you make it big in the art world, remember who showed your work first. Right here, babe.)
Fuchsia didn't really come out the way that I thought it would -- it's a little close to the purple. But it's pretty and you can still tell the two are different, so it works. Here it is, next to its package:

And here are all of my needles and Jan's needles together -- four sets o' needles! (Click on through to Flickr if you want to see them bigger):

All that's left to do is the [potentially optional] step of using steel wool on them and then polishing them with a soft cloth. I say "potentially optional" because it seems like some people did and some people didn't and it's tough to say if it makes a difference, but I probably will.
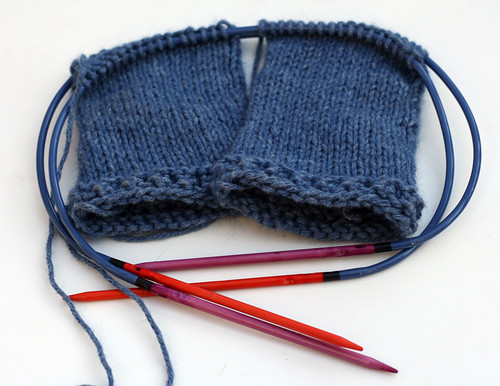
Of course, I've already got mine in use on a project:
Overall, I am very happy with how they turned out. While ours are not as vibrant as the ones from KnittingHelp, they are beautiful and useful, and that's just what we wanted. Also, they did not melt. And that is most definitely what we wanted.
love,
kelly


5 comments:
hmmm...my cat must be an artist too, but her preferred medium is my leather shoes and handbags. perhaps she a seamus should mount a show together...
-ren
Hee hee. Our cat Biscuit's preferred medium is shoelaces and knit fabric.
But we have a far less polite name for him than "artist" when we find that our laces need replacing when we're on our way out the door!
As a bonus, dyeing makes the needle size numbers much more visible, which is great for my middle-aged eyes. (Bifocals?! Dammit, when did that happen?!?!?)
Seamus is pretty good about sticking with our preferred artistic medium (we keep him supplied with packing paper) although he occasionally confuses bed linens with packing paper :(
Wow, that was quite an undertaking - they look awesome! The colors are delish.
Patsy has a thing for flip flops. I wouldn't call it art, though. I went through several pairs last year. This year, I'm going to try really hard to put all flip flops away in the hall closet.
I was wondering where you had gotten the new needles today!!! They look fantastic!
I'm lucky Misi doesn't seem to have artistic notions....yet.
Post a Comment