Wednesday, November 28, 2007

My mom is a princess!

Dear Shayne,

I haven't been able to post much lately because I've been working on Christmas gifts and I don't want to spoil any surprises! Also, because it's getting dark so early now, it's tough to get good daylight photos. Blech.

Anywho... my mom isn't online, so I can post this project I made for her birthday, which is this weekend.
Mom's crown: front

The inspiration for this project came from a iHanna's blog, where she made a super cute crown for herself last week. (Go look! It's cute!)

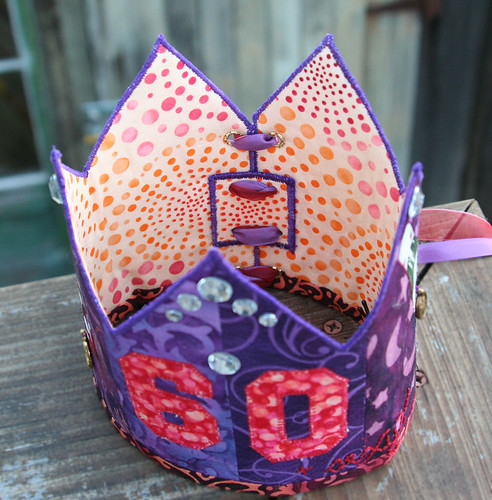
As you can guess, my mom is turning 60 (and she's going to be super-duper happy to discover that I've announced that to the world on our blog) (Hi, Mom!) But my mom... you'd never believe she was 60. She looks fantastic and acts like a teenager (in a good way!) and she's just generally awesome. So... I made her this crown. To celebrate her awesomeness.

Here's one side of it:
Mom's crown: left

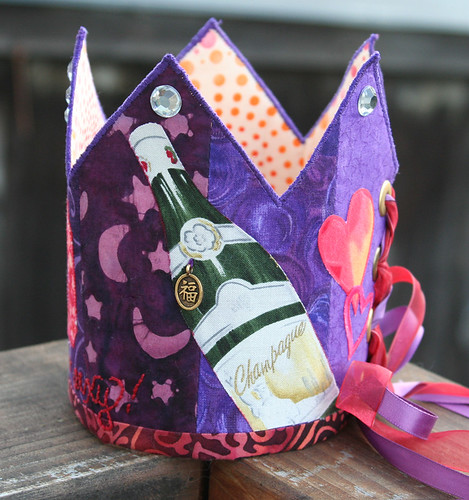
That charm says "Happiness" on the back. I hope she has a lot of champagne and happiness this year. And every year, really.

And here's the other side:
Mom's crown: right

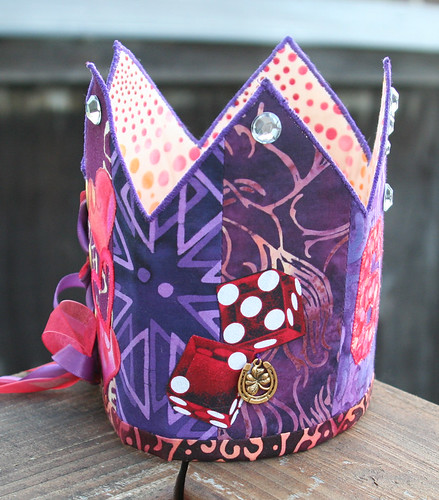
I liked those dice paired with the good luck charms. Everyone needs luck, right?

And here's the back... the ribbons dangle down about 2 feet, which I really like:
Mom's crown: back

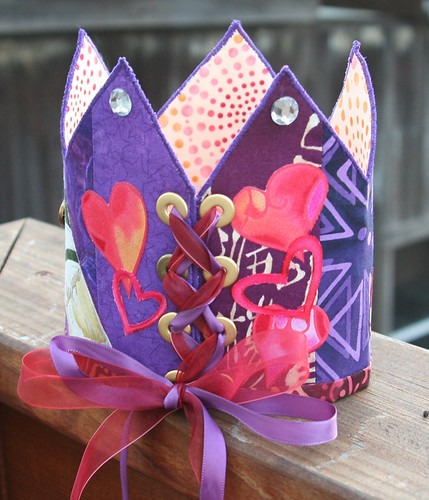
Hearts... ya know, cause I love her. (Awww.)

Now, Shayne, you know I have this problem, right? The one where I end up spending waaaay too much time on a project, as it just spirals out of control, but then I can't turn back because I've gone too far. You know the one.

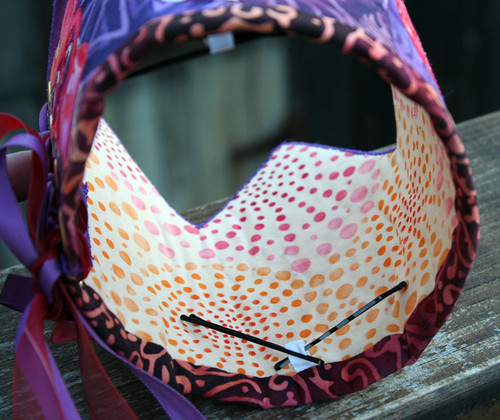
I really thought this project through. Even to where I installed little loops for her to put bobby pins through to pin to her head (it's sort of a tiara-y thing -- sits on top of the head...) See? Look:
Mom's crown: bobby pin loops

But I got the crown all made flat and realized I was stumped as to how to put the back together. Hand-sewing was out of the question because the interfacing I used was too thick. And of course I couldn't put the cylinder through the sewing machine in that direction. Duh. So I came up with the grommets, which I liked, but when I laced it up, it made the crown tear-drop shaped, instead of round.

So I came up with another crazy scheme. I went to the craft store and bought some kind of wacky product that you use to make a super stiff waistband in your skirt if you either a) are a 50's housewife or b) hate yourself. I cut a piece of that, fused matching fabric to it, serged around the edges to match the top of the crown, punched 4 holes in it, glued it inside, put the laces through it and... voila:
Mom's crown: inside

It worked! And it looks pretty nice (if I do say so myself). This part of the project took almost as long as the rest of the project itself. Whee.

Meanwhile, there is a very good chance that my mother is going to get this thing and say, "What the hell?!" But I hope she likes it.

love,
kelly

PS -- It's kind of hard to see in that first photo, but I embroidered "+ sexy!" after the 60 on the front. Hee hee. Go, Mom!

Mitt in Action

Dear Kelly,

Thank you so much for my wonderful mitts! Here's a picture of one in action:


I love my mitts! (Nail polish is OPI Russian Navy.)

Love,
Shayne

Monday, November 19, 2007

Your mitts!

Dear Shayne,

Last week, I posted your yarn. And today... your mitts!

Shayne's mitts

(I think the color is more accurate in the yarn photo.)

I put them in the mail this morning, so here's hoping you have them by the end of the week -- I know it's getting chilly there!

Per your wool-ergies, they're cotton, so I'm afraid they won't be the warmest things in the world, but certainly good for keeping your paws warm while typing. This yarn was really nice to use -- very soft and lovely. Hope you like 'em!

love,
kelly

Saturday, November 17, 2007

So good together

Dear Shayne,

Ever had one of those projects that just spirals out of control, slowly at first, then faster and faster till you're thinking, "Gosh, I shouldn't have spent so much time on this..." but at that point, you've got to push forward because there's less time until you're finished than there has been since you started?

Or is that just me?

Sigh. I bought a neat hand-printed wood type letterpress poster for Bill several months ago. I planned to frame it in time to give it to him for our anniversary in July, but failed. It's a weird size, so I was either going to have it custom framed or frame it myself. I like to do my own framing, sooo... I went with that plan. And stalled out for a bit.

Finally, I ordered a frame here (great source for cheap make-your-own frames, by the way) and I went to the framer across the street from our house for some nice non-glare glass. Halfway there, right? Yeah, right. Let the spiral begin.

I was originally going to cut a mat for it, but (insert faster spiraling here) I didn't really have any mat board that would look good with it. So I was all set to go buy mat board but... I've really been trying to use what I have.

So I thought, "Well, what could I use to border this print?" (Unfortunately, the frame I bought required a mat for the print to fit... buying a new, smaller frame did occur to me at this point, but no! Use what you have! Use it!) I thought of using some pretty paper, but the only paper I had that was 24" long (the height of the frame) didn't really go.

Then I thought... perhaps I could piece some paper together? For a patchwork-y kind of background? As soon as I thought of patchwork, I thought of fabric (of which I have a ton). Yes! Patchwork fabric background!

Shayne, it was here that I should have stopped myself. Alas, I did not. Instead, I cut out a bunch of fabric pieces and sewed them together. (Seriously. Sewed.) Then I ironed them onto fusible interfacing, then mounted the poster on top of all of this and, at last, I finally have a framed print for Bill:

So good together
Whew!

love,
kelly

PS -- I bought that print here, but it looks like they're all sold out now.

Tuesday, November 13, 2007

Your future mitts

Dear Shayne,

I just wanted to post a photo of the yarn you bought when we went to All About Yarn together.

That place was fun, although it was so packed with yarn that it was often a stretch to reach the highest yarn locations. Oh, well... I'd rather have too much yarn at a yarn store than too little!
Araucania Yarns Patagonia Nature cotton

As you know, I'm going to make you some fingerless mitts out of this (it's called Patagonia Nature Cotton by Araucania Yarns).

Do you want me to post teaser photos as I make them or do you want to wait and be surprised?

love,
kelly

Sunday, November 11, 2007

Big fun scarf

Dear Shayne,

Do you remember when we went yarn shopping together and I bought this super-awesome yarn?
Trendsetter Yosemite yarn

I'm making a fun scarf out of it! I know this wacky, chunky style isn't everyone's bag, but I reeeeally like it. Here's what I've got done so far:
Chunky purple scarf (in progress)

It's difficult to tell how long that is from the photo, but it's about 24". Those needles are gigantic and handmade by my friend Dawn. (Hi, Dawn!) How cool is that? Answer: Um, totally!

love,
kelly

Saturday, November 10, 2007

Journal ring: Round 2 (the rest)

Dear Shayne,

Quite awhile ago, I posted two of the pages that I did for the second round of that Journal Ring I participated in on Craftster. I just realized today that I never posted the rest of the pages, so here they are.

I'm sorry -- this post is super-long. I should probably spread these out over the course of several days, but I've got some time right now, sooo... I'm doin' it. Grab a cup of cocoa or something, cause it will take awhile to get through all of this.

This is the first set. My favorite part about it is that I used my modern-day spirograph to make the background -- it's not as good as the one I had when I was a kid, but it's still pretty darned fun:
Journal #2.2 - left page

I also used paint, stencils, stamps -- what you'd expect when looking at it. I wish I had scanned these pages... the photos aren't great. They were pretty fun in person. I really "free formed" with these and I like the way they turned out.
Journal #2.2 - right page

Next up was kind of a "scrapbook-y" style. I took a bunch of ephemera that I thought would look nice together and then I sewed some clear plastic pouches to hold it. The person who gets this book can take it out of the pouches and look at it:
Journal #3.2 - left page

(The answer to the "9 out of 10 women..." riddle is inside that card when you open it up... ration stamps. And there was an actual ration stamp in there. Kinda cool.)

On this next page, the folded piece of paper in the lower left corner was a hand-written receipt from the 50s. I wish I had scanned it, because I remember that it amused me at the time. Oh, well.
Journal #3.2 - right page

For this next one, I cut out the states that everyone in the swap lived in.
I overlaid the states by gluing down a semi-transparent handmade paper and I really like the effect. Then I made little envelopes with tags inside. Here's the left page:

Journal #4.2 - left page

And here's the right:
Journal #4.2 - right page

On the tags, I used an old atlas and a round punch to cut out the city that each person was from. On the back of each person's location tag was their craftster user name (except I put "you" and "me" for the journal owner and myself... hee hee) Here are the tags:
Journal #4.2 - tag detail

This last one was by far my weirdest and most experimental. Looking at it now, it's probably good that the swap ended when it did. Hee hee. Here is the left page:
Journal #5.2 - left page

I found those girls in an old National Geographic and they cracked me up -- they're eating cotton candy. That page says "AAAAAA" all over it, because I think that's what they're saying as they open their mouths to eat the cotton candy.

The next page is the "ZZZZZZ" page... that's what a bee says (that's a little gold bee on the page). Also, that's what Zebra starts with. So here they are:
Journal #5.2 - right page

It was only after I put those zebras together like that that I realized they were almost perfectly mimicking the posture of the girls on the other page. That cracked me up.

Whew! Ya still with me? Sorry about the super-long post, but I hope you enjoyed it -- I had fun with this swap, but I'm out of the swap game for at least awhile. I've got too much non-swap crafting to do!

love,
kelly

Monday, November 05, 2007

Jenny's birthday gifts

Dear Shayne,

A couple of weeks ago, it was Jenny's birthday (Hi, Jenny!) As you know, she's my BFF (since we were young enough to say "BFF" for reals!) and I made her some stuff.

First up, these fun earrings that I made out of Scrabble tiles -- her initials are JN. I've never tried this before and I think they came out great (if I do say so myself):
Scrabble tile earrings for Jenny

I need to make some of those for ME! I have a ton of Scrabble tiles waiting for more crafty fun.

She lives in the wintry North, so I also made her some hats. First up, a wool cap from lovely Malabrigo. It's so soft, it's like knitting with kittens! (Unfortunately, I believe it will start to pill dramatically before too long... alas, the downside of soft wool...)

I still don't have a head model, so I used a balloon for these photos:
Blue hat for Jenny

I made her yet another hat in the football team colors of our hometown, where our friendship was first forged: Go, Browns!
Cleveland Browns hat for Jenny

(I gotta say here that she wore that hat to the Browns game yesterday and they totally WON in a very exciting overtime! I'm pretty sure it was the hat.)

She seemed pleased with the gifts, although she mentioned that her 4 year old son has claimed the hats... so it looks like I've got some more hat making to do in my near future!

love,
kelly

DC Craft Mafia Show

Dear Kelly,

So I'm a member of DC Craft Mafia and we put on our very first craft show on Saturday. Of course, I had to shop from some of our awesome vendors!

This little 3-d angel picture is from the lovely Joanna of The Palace of Varied Industries. Unfortunately, she doesn't have a website. But she make wonderful little scenes and silhouettes (I bought a little doggie picture from her when we met this past summer at another show) and shares a booth with her friend Helen, who makes adorable scarves from old sweaters, which I can't actually touch due to my woolergies. Hopefully, these crafty ladies will be on the web soon.


This little print is from Twin Pixie Studios. You know how I love birds!


Randy bought himself this button from Ugly Kitty.


Also from Ugly Kitty, I bought two of these New Jersey buttons for some Jersey Girl friends


and this super comfy pillow (one's ear rests gently in the seam).


From Cleo Dee, I got this squid ornament. See, she's pink and wears nerd glasses and has a laptop, just like me :)


Before the show, I placed an order for "Zombie Weiners" from Peter Malinoski and I picked it up from him at the show.


Last but not least, my friend Erica commissioned an early Christmas present for me from Brookadelphia. "dork" specially cut in pink for me


Cool stuff, huh?
Love,
Shayne

P.S. We raised almost $300 for the Washington Humane Society.

Thursday, November 01, 2007

It's only rock n' roll...

... but I like it!

Dear Shayne,

This year for Halloween, we had a Rock n' Roll theme at work. As you may recall from last year, I like to wear my skates to work on Halloween (cause, um, it's SUPER FUN to skate around work all day!)

Last year, I dressed as an angel, wore my skates, and went as a "Holy Roller" (pics of my wings and halo waaaay down in this post). The year before that, I was Hell on Wheels (no pics!) Before that, I was my Mini (craftster link to that one here).

This year, I made a bunch of fake stones, stuck them to myself, strapped on my skates and went as... The Rolling Stones! Hee hee.

Here's the costume (sans skates... sadly, my dressform does not have feet):
It's only rock n' roll...

I made the stones using crumpled up newspaper covered in Rigid Wrap (which is hilarious, because of its circa 1962 product packaging, and also messy to use -- a real bonus in a craft supply!) And then I painted it with a fake-stone paint. They really came out great (if I do say so myself).

Perhaps my favorite part of this costume was taking off the stones and making a fun diorama:
Off-roading Mini!

Hee hee! Off-roading Mini! Yeah!

All right. Time to start thinking of next year's wheeled Halloween costume...

love,
kelly